
 In this new serie of articles, we will see how to create a simple web application using Spring Boot as an acceleration framework for back-end development and REST services implementation, MongoDB as a NoSQL database and Angular 4, with TypeScript support, such as javascript framework for the front-end.
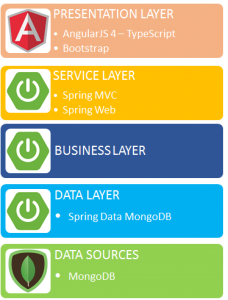
Trying to schematize, we could map this list of technologies to the various levels of the classic diagram of a multi-tier architecture, getting the result shown in the image here to the right.
Finally, we will also deploy it to Azure, the Microsoft’s cloud platform, using an Azure Webapp as a container for our Spring Boot application and a series of Virtual Machines on which we will install our MongoDB Replica Set.
The following diagram describes, at a high level, what will be the physical architecture of our solution deployed on Azure.

Well, we can start!
What is Spring Boot?
Spring Boot is a framework for the development of Java-based web applications that offers, thanks to its conventions and so-called “starters”, an additional level of abstraction, especially in terms of project setup and configuration and of dependencies management, compared to the use of Spring Framework. It thus allows us to further reduce the time needed to implement and distribute our solutions.
As we go ahead in the article we will see all the benefits that Spring Boot introduces in developing a web application, while for now we limit ourselves to this first list of its main features.
Spring Boot in fact:
- provides a long list of “starters” that allow you to include in your solutions the most commonly used libraries with minimal effort and without having to worry about further inherited dependencies
- It allows you to create a webapp as a simple Java executable package (.jar), which can then be started as a standalone program as it embeds a container such as Tomcat or Jetty within which the application runs (although it is still possible to produce a war to be deployed in external container servlets previously installed and configured)
- It allows you to configure the main libraries and frameworks commonly used in development by simply setting the appropriate pre-defined properties within its “application.properties” configuration file. Properties for which, as we will see later, its development IDE “Spring Tool Suite” provides the search and self-completion functionalities.
Spring Tool Suite
Spring Boot has a dedicated development environment called “Spring Tool Suite” which is actually nothing more than an appropriately customized version of Eclipse.
So first, let’s proceed with the installation of this environment. You can download “Spring Tool Suite” from the website https://spring.io/tools and, once downloaded, just follow the installation procedure

Create a new Spring Boot project
Once we’ve installed the “Spring Tool Suite” environment, we can proceed with creating our first Spring Boot project.
To do this we select from the “File” menu the item “New” -> “Spring Starter Project”, as shown in the following figure
 and we insert the name of the project, such as “SpringBootAngular4Example”, and its characteristics.
In particular, we point out that:
- It will be a Maven project
- It will be packed as a jar executable file
- It will use Java version 1.8
 By clicking on “Next”, we go to the next screen of the project creation wizard, which asks us which “starters” modules we want to initially add as dependencies.
For our example we select:
- Web: adds a series of “base” packages needed to develop a spring-based web application (spring-web, spring-mvc, jackson, ecc)
- MongoDB: adds “spring-data-mongodb” to our project
- Thymeleaf: is one of the template engines supported by Spring Boot. In fact, we will not use it as such, as we will develop the front-end part as a Single Page Application with Angular 4, but we only include it in order to benefit from its configuration for resolving view names and avoid writing ad hoc configuration code
- Lombok: useful to further reduce the amount of boilerplate code in the definition of our POJOs
The image below shows the selected dependencies:
 By clicking on “Finish” we complete the creation of the project that will now appear in the “Package Explorer” section of our development environment with the typical structure of a Maven project as we can see from the following figure:
 As we can see, in the new project have been created:
- The SpringBootAngular4ExampleApplication.java class, which represents the entry point of our application
- The static and templates folders, under the resources directory “src/main/resources”
- The application.properties file
If we open the FirstSpringBootApplication.java class we see that its content is as follows:
package net.davismol.springangulardemo;
import org.springframework.boot.SpringApplication;
import org.springframework.boot.autoconfigure.SpringBootApplication;

@SpringBootApplication
public class SpringBootAngular4ExampleApplication {
	public static void main(String[] args) {
		SpringApplication.run(SpringBootAngular4ExampleApplication.class, args);
	}
}
@SpringBootApplication is a Spring Boot annotation that encloses @Configuration, @EnableAutoConfiguration and @ComponentScan annotations to configure the application with the default parameters.
The main instead contains a call to the “run” static method of the SpringApplication class that actually executes the application.
 If we open the Maven POM file, “pom.xml”, we see that the following dependencies are defined within it, relating to the “starters” modules we had selected during the creation of the project:
			org.springframework.boot
			spring-boot-starter-data-mongodb


			org.springframework.boot
			spring-boot-starter-web


			org.projectlombok
			lombok
			true


			org.springframework.boot
			spring-boot-starter-test
			test


			org.springframework.boot
			spring-boot-starter-thymeleaf
 Each Spring Boot “starters” contains a file called “spring.provides” that contains the list of libraries the starter itself includes.
For example, to see what packages are contained in the “spring-boot-starter-web” starter, we look for its jar through the Package Explorer in the list of “Maven Dependencies” and, clicking on it and entering the “META-INF” folder, we find the “spring-provides” file. By opening it with a double click we can see its contents:
provides: spring-webmvc,spring-web,jackson-databind

Go to the next part of the article: Part 2
Pingback: Create a modern web application with Spring Boot, MongoDB, Angular 4 and TypeScript and deploy it in cloud as Microsoft Azure Webapp – Part 2 | Dede Blog
Pingback: How to create a web application from scratch with Java, Eclipse, Tomcat, Hibernate and PostgreSQL – Part #1 | Dede Blog
Pingback: How to create a web application from scratch with Java, Eclipse, Tomcat, Hibernate and PostgreSQL – Part #3 | Dede Blog
Pingback: How to create a web application from scratch with Java, Eclipse, Tomcat, Hibernate and PostgreSQL – Part #4 | Dede Blog
Pingback: How to create a web application from scratch with Java, Eclipse, Tomcat, Hibernate and PostgreSQL – Part #5 | Dede Blog